

Create and set up a Garry’s Mod server
With this guide, you'll set up your own Garry's Mod server – with your gamemode, your map and all addons from a Workshop collection. You'll need a free Steam server token for this. AeonHost handles the rest.
What you need
- Garry's Mod for you and your fellow players.
- A plan with at least 4 GB RAM. Many addons or large maps need more.
- A Steam account to create the server token (GSLT).
- Optional: a Steam Workshop collection with maps, gamemodes and addons.
1. Create a Steam server token
The token (Game Server Login Token, or GSLT for short) connects your server to Steam. Without a token, your server drops far down the server list.
- Open steamcommunity.com/dev/managegameservers and sign in.
- Enter
4000under App ID of the base game – that's Garry's Mod. - Enter a label under Memo, for example “AeonHost GMod”.
- Click Create and copy the token (32 characters).
Treat the token like a password, and create a separate one for each server.
2. Set up Garry's Mod in the panel
Because the token belongs to your Steam account, you set up Garry's Mod yourself after purchase. In the configurator, order a plan with at least 4 GB RAM – it doesn't matter which game is preselected there.
- In the customer area, open your server's page and click Open in Panel.
- On the left, select Spiel wechseln (switch game). Under Verfügbare Spiele (available games), select the Garry's Mod card.
- Paste your token into the Steam Account Token field.
- Tick Verstanden (understood) and click Jetzt wechseln (switch now).
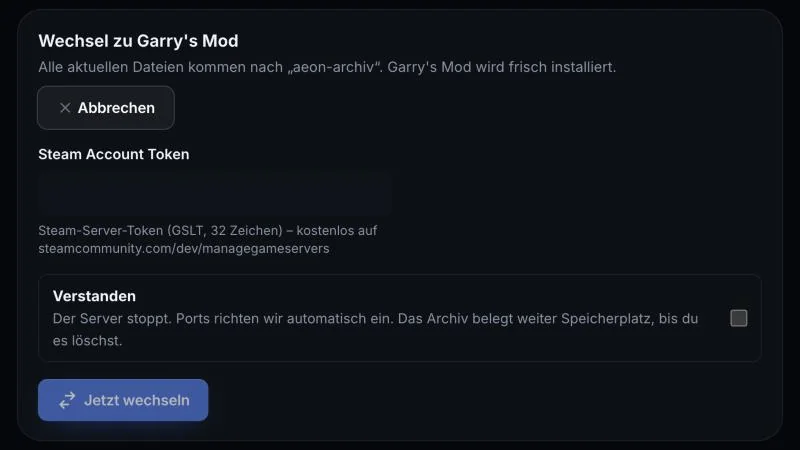
The server stops, AeonHost installs Garry's Mod, and starts it. Your previous files are not deleted; they're kept in the aeon-archiv folder. Under Archiv (archive), you can restore them at any time with Zurückwechseln (switch back). More on this: Switching games on your server.
3. Gamemode, map and player count
In the panel, under Startup, you'll find the Server variables:
- Gamemode – for example
sandbox(default),terrortownfor Trouble in Terrorist Town, or the folder name of a Workshop gamemode. - Map – the starting map, default
gm_flatgrass. Enter Workshop maps using their file name without.bsp. - Max Players – at most 128, default 32.
- Tickrate – how many times per second the server calculates the world. Default 22. The Garry's Mod wiki recommends 30 to 128; higher values need more CPU.
- Workshop ID – your collection (step 4).
- Steam Account Token – your token from step 1. This is where you swap it later.
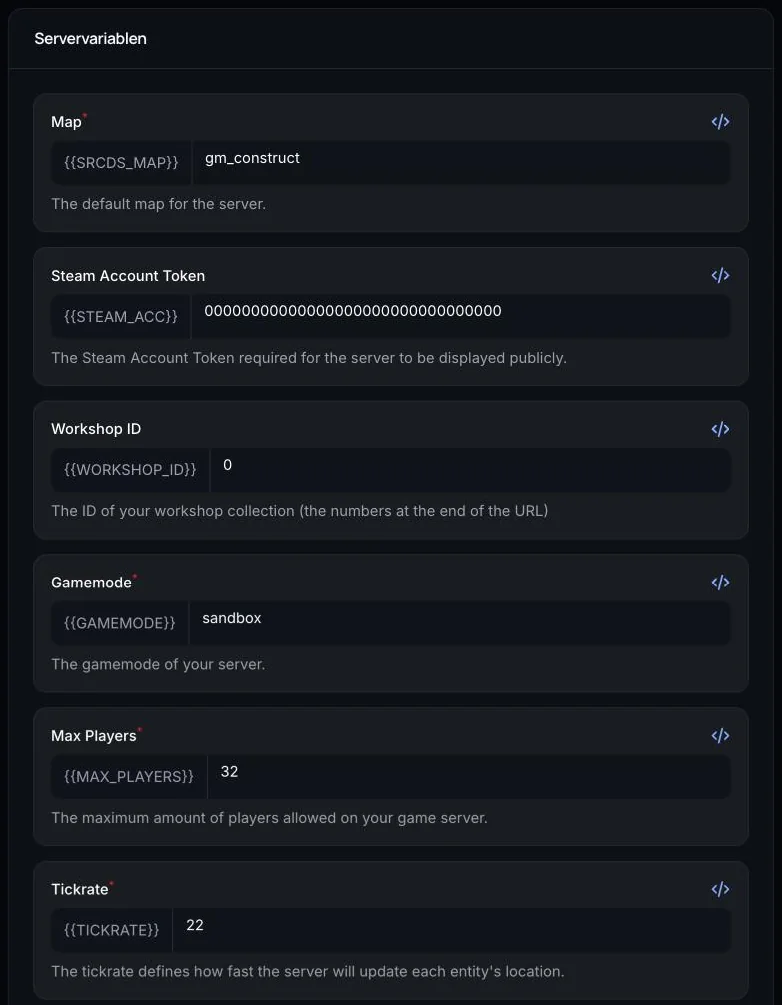
Restart the server after every change.
4. Addons via a Workshop collection
- Create a Workshop collection on Steam with all your maps, gamemodes and addons. It must be public or unlisted, otherwise the server can't load it.
- Copy the number at the end of the collection's address (
?id=…). - Enter it under Startup, in the Workshop ID field, then restart the server.
The server loads the collection on every start and keeps the addons up to date. The field takes exactly one collection, so put everything into the same one. Sub-collections are loaded as well. Only add addons you trust: they run with full rights on your server. Background: Workshop for Dedicated Servers.
5. Connect to the server
The address is shown in Quick controls, on the Connect card.
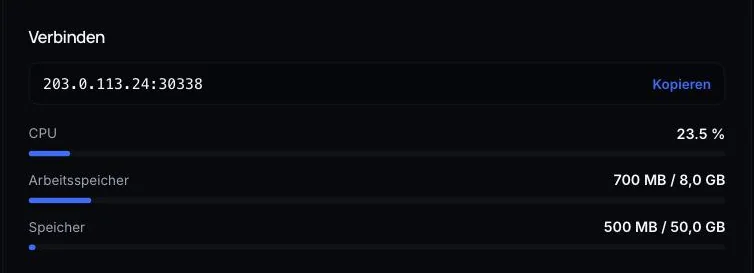
- Server list: In the main menu, choose Find Multiplayer Game and search for your server name.
- Direct: Open the developer console (enable it in the options, then use the
^or~key) and enterconnect IP:Port– using the address from Connect.
6. Become an admin with ULX (optional)
ULX is a popular admin addon and requires ULib. Both are available on the Steam Workshop.
- Add ULX and ULib to your Workshop collection and restart the server.
- Join the server once so it learns your name.
- Enter the following in the Console in the panel or in Quick controls:
ulx adduser "DeinName" superadmin
Only give admin rights to people you trust.
7. Backups and co-managers
Use Back up now in Quick controls to create a backup before making bigger changes. On the same card, set a daily restart. This way, the server also picks up addon updates on every restart.
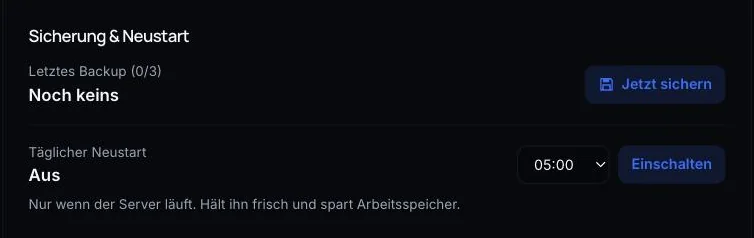
Do you want a friend to co-manage the server? Invite them under Invite co-players – with Console & restart or Co-manage (which also covers files, backups and settings).
Common problems
The server doesn't appear in the server list
Check the token under Startup: it must be exactly 32 characters, created with App ID 4000, and not used for another server. On the Steam page, you can see whether the token is still valid. If necessary, create a new one and enter it.
The Workshop addons are missing
The collection must be public or unlisted, and under Workshop ID, the number must be the collection's – not that of a single addon. In the console, you see at startup which addons are loaded.
Players see error textures or red ERROR models
Players are missing content the server uses. Maps and gamemodes from the collection load automatically; for other content, it's best for players to subscribe to your collection.
I switched the game by accident
Under Spiel wechseln, in the Archiv section, you can restore the previous game with Zurückwechseln, including its worlds and settings.
Further reading
- Garry's Mod server at AeonHost
- Switching games on your server
- Transferring files via SFTP
- Official: Steam Game Server Accounts in the Garry's Mod wiki
Did this guide help? We are happy to help personally.